How Can I Burn DVDs In Windows 10? How do you save a movie made in Windows Movie Maker to DVD that will play on a DVD player now that Windows 10 eliminated Windows DVD Maker? Windows 10 is an entirely new version of the veteran Windows operating system by Microsoft. The latest Windows 10 system, is no longer just an operating system for 32-bit and 64-bit PCs, but also run on the ARM platform for smaller tablets and smartphones. Universal apps will run not only on PCs, but on Windows 10 phones, Windows 10 for IoT devices and Xbox as well.
If you’ve used Windows DVD Maker to create DVD movies in Windows 7, you will be disappointed to find that there is no Windows DVD Maker in Windows 10. But it does not mean you have to live without it. UFUShare will give you walkouts to make DVDs in Windows 10.
Methods to Make/Burn DVD disc in Windows 10 without Windows DVD Maker for Windows 10
Method 1:Make/Burn DVD in Windows 10 using DVD Maker/Burner for Windows (Recommended)
Method 2:Make/Burn DVD in Windows Media Player in Windows 10
Method 1: Make DVD/Burn in Windows 10 using DVD Maker/Burner for Windows 10
UFUShare recommended DVD Maker/Burner for Windows 10 is the professional DVD making/burning software on windows 10, provides the best solution to convert any popular video formats such as MP4, MOV, AVI, WMV, 3GP, MKV, MTS, etc. to DVD disc, DVD folder and ISO file. So that you can share them with your family or friends on your DVD player.
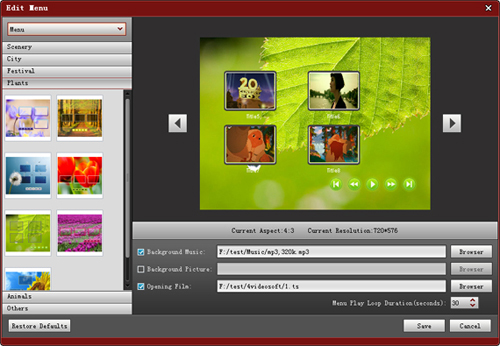
This amazing DVD Maker/Burner for Windows 10 enables you to download online videos, edit videos, add video effects, customize the DVD menu by choosing the DVD template, background, frame style, button type and title content. You can also add audio track and subtitle for the output DVD to meet your need.
Step 1: Download and install DVD Maker/Burner for Windows 10
The DVD Maker/Burner for Windows 10 trial version will add a watermark to the output DVD with no functional difference from the full version. You can pay for registration code from the buy link built in the program.
Step 2: Import videos, audios or images to the Windows 10 DVD Maker/Burner
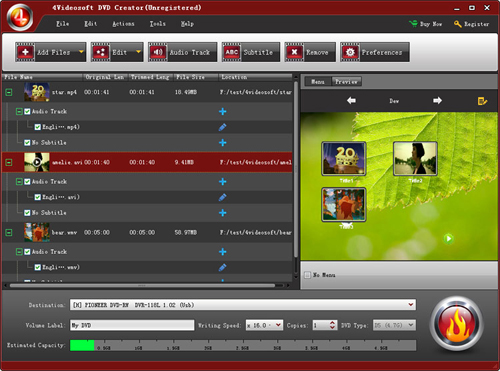
In DVD Maker/Burner for Windows 10, click “Add Files” to add video, audios, photo files onto the program. Added files will then be displayed as a medium size icon or “thumbnail” on the left hand side of the screen. Alternatively, you can drag and drop your video/photo files from its folder.

Step 3: Customize a DVD menu (optional)
Click “Edit” on the bottom of the program window, and then pick up your favorite template to customize it. And you can freely adjust buttons, frames, titles, and thumbnails as you want.

Step 4: Start making/burning DVD in Windows 10
Hit on the the “Burn” icon to access the “Burn” window. Insert a black DVD-R D5 or D9 as per your content capacity, and set the TV standard like NTSC or PAL. At last, click “Save” to start burning.
Method 2: Make/Burn DVD in Windows Media Player in Windows 10
In Windows 10, you can make/burn DVD in Windows Media Player.
Note: This method is free, but your movies files must in the format that Windows Media Player supported. You will not be able to add menus or graphics to customize the DVD disc. Also DVD Making/Burning process is a little bit long, wait enough time before DVD making/burning is finished. If your movie files are in the format incompatible with Windows Media Player, or your prefer a more professional way to make/burn DVD, refer to Method 1.
DVD Maker/Burner allowed us to make menus and apply screen art. That is now gone. I could burn a wmv or mp4 to a dvd no problem. But it’s just a file. No menu and graphics for the person whom puts it in their DVD Player.
- Open Windows Media Player
- In the Windows Media Player Library, tap or click the Burn tab, tap or click the Burn options button Options button, and then tap or click Data DVD.
- Insert a blank disc into your DVD driver.
- If you see the list from your last selection and want to start a new list, tap or click the Clear list button to remove the previous one.
- Find the items in your Player Library that you want to burn to the disc.
- Drag items from the details pane (in the middle of the Player Library) to the list pane (on the right side of the Player Library) to create a burn list.
- If you want to change the order of the items in the burn list, drag the item up or down in the list.
- If you want to remove an item from the burn list, double-tap or right-click the item, and then tap or clickRemove from list.
- When you’re happy with the list, tap or click Start burn.


