Can’t open Sony PMW-400L XAVC MXF video files in Final Cut Pro 7/6 or FCP X? If so, just follow this simple guide to transcode XAVC to ProRes, which ensures the best results when working with FCP 7/FCP X.

I’m searching for a solution to getting XAVC clips directly from Sony PMW-400L to Final Cut Pro X/7. I had searched the method and tried the Log and Transfer, but still failed. An alternative way I found to open Sony PMW-400L XAVC clips in FCP X/7 is to convert XAVC to ProRes. I’ve tried the workaround. Yes, it works. Now I’m going to share the details for importing Sony PMW-400L XAVC to Final Cut Pro X/7. If you are stuck in the issues, just read on.
Generally, we can use Log and Transfer or Log and Capture to import videos, images, etc to FCP X/7 for editing. But the new XAVC codec is not supported well by Final Cut Pro X/7. Since, Apple ProRes is the most compatible codec for FCP, so if we want to edit Sony PMW-400L XAVC in FCP X/7, it is necessary to convert those already shot XAVC files to ProRes .mov using third-party software.
To transcode XAVC to ProRes, I recommended you to try UFUShare Video Converter for Mac, which a professional yet easy-to-use tool for Mac users to transcode full HD 1080p and ultra HD 4K to Final Cut Pro X/7/6 with the best quality. With it, you can effortlessly transcode Sony PMW-400L XAVC codec to ProRes encoded MOV files keeping the original quality. Besides FCP X/7, this software can also export DNxHD for Avid MC, MPEG-2 for Adobe Premiere Pro, ProRes for Final Cut Pro X/7, Apple InterMediate Codec for iMovie and more NLE systems for native editing.
 Download Video Converter for Mac:
 Download Video Converter for Windows:
Tutorial on Converting Sony PMW-400L XAVC to Final Cut Pro X/7 in Simple Steps
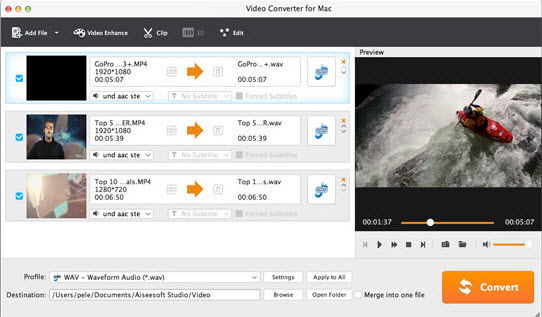
Step 1: Launch the XAVC to ProRes Converter on your Mac, then click the adding button to import your XAVC flies from HD drive or your Sony PMW-400L camcorder directly.

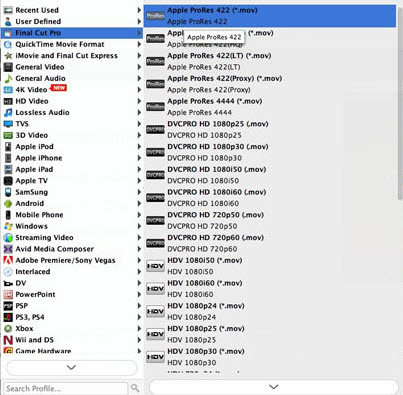
Step 2: Click on the “Editing Software” and you will see options to convert your .mp4 video for certain video editing software. Since you will be importing the video to Final Cut Pro after the conversion, have “Apple ProRes 422” be your selected output format. You can also choose “Apple ProRes 422 HQ” or “Apple ProRes 4444” as the output format. Set bitrate and frame rate if necessary by clicking “Settings” button.

Step 3: Press the “Settings” icon and you’d better set the video frame rate as 30fps, video size as 1920*1080 for editing Sony PMW-400L XAVC in FCP X/7/6 easily.
Step 4: Hit the Convert button in the main interface to start the XAVC to FCP X/7/6 conversion on Mac OS X.
After the conversion, you can run the Final Cut Pro and click File –> Import –> Files to import the converted Sony PMW-400L XAVC files and edit them in FCP without any rendering or unrecognizable problem.


