After upgrading your system to Windows 10, you will find that it is unable to burn DVD movies with your own videos as it used to be on Window 7. The reason is that Microsoft removed DVD Maker from Windows 10. This is really frustrating, making your work flow less efficient. Looking for a Windows DVD maker in Windows 10?
Honestly, there is too much DVD burning software in the market. For choosing the most appropriate one, there are 4 points for reference: ease of use, quick burning speed, powerful features and stable performance. Finally UFUShare will give you walkouts to make DVDs in Windows 10.
3 Methods to Make DVD disc in Windows 10 without Windows DVD Maker for Windows 10
Method 1:Make DVD in Windows 10 using ImgBurn
Method 2:Make DVD in Windows 10 using 4Videosoft DVD Creator for Windows (Recommended)
Method 3:Make DVD in Windows 10 using DVD styler
Method 1: Make DVD in Windows 10 using ImgBurn
ImgBurn is a piece of lightweight free disc burning software for Windows 10 in 2016, which is specially designed for burning CD, DVD & Blu-Ray. It is capable of writing images like ISO & files/folders to DVD disc and creating ISO image from DVD disc, files/folders. Also, it can verify and discovery disc for checking if the disc is completely readable and how about burning quality. All these features are classified in 5 modes: Read, Build, Write, Verify and Discovery.
How to Make DVD in Windows 10 using ImgBurn?
Step 1: Open up ImgBurn and select Write files/folders to disc.
Step 2: Click the open folder icon (it is the one the red arrow shows above) and select the top level folder that contains both your VIDEO_TS and AUDIO_TS folders. If you don’t have such structure, just organize your DVD files like this before loading them in ImgBurn. Keep in mind that we are burning ready DVD files. If you have another type of video files, like avi or mkv for example you need to convert them to DVD format first or you can using the Method 2, which can direcly deal with kinds of videos formats.
Step 3: After you add the folder, click the calculator icon(1) to see the size of your project. Then click the Device tab (2).
Step 4: Here you can set the write speed (1). I suggest you keep the max speed low, especially if you plan to play the DVD in older standalone players. Remember to use quality media as well. Next, click the Options (2) tab.
Step 5: At the Options tab make sure File System (1) is set to ISO9660 + UDF. To continue, select the Labels (2) tab.
Step 6: Here set the label your DVD will have. Not so important, but will help you understand which DVD you entered in a player before. Set the name in both fields (1) and you are ready to start burning (2).
Step 7: Before the burning starts, ImgBurn will confirm you are burning a DVD Video disc. Make sure everything is fine, and click OK.
Step 8: ImgBurn will now start burning and a few minutes later your new DVD Video disc will be ready.
Method 2: Make DVD in Windows 10 using 4Videosoft DVD Creator for Windows (Recommended)
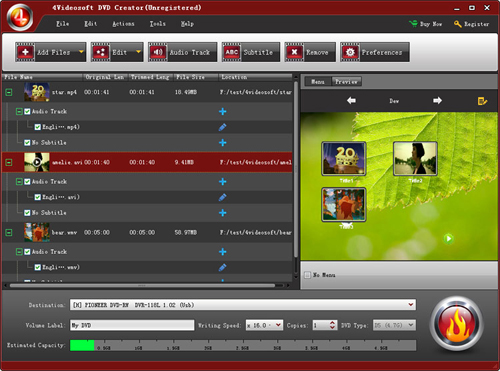
If you use the ImgBurn and think it is not powerful and 4Videosoft DVD Creator for Windows is by now the best Windows 10 DVD maker. With this software, you can burn video in Windows 10 from almost any video format, like AVI, MKV, MP4, M4V, 3GP, MOV, MXF, MTS, VOB, M2TS, XAVC, and etc. Besides, you can make beautifully designed DVD slideshow with music and effect. Also, the built-in editor lets you personalize videos and photos before burning. It is absolutely a great application for creating DVDs in Windows 10.
Step 1: Download and install DVD Maker for Windows 10
Download the Windows 10 DVD Creator, then double click the downloaded installation file to finish the installation following the instructions.
Step 2: Import videos, audios or images to the Windows 10 DVD Maker
Click the “Add Files” button add files button or click “File(s)” to choose to add video/audios/images or add folder.

Step 3: Edit video effect
Click “Edit” button to optimize the video before burning to DVD on Windows 10. You can trim, crop, watermark video and change video visual effect.
Step 4: Edit DVD menu
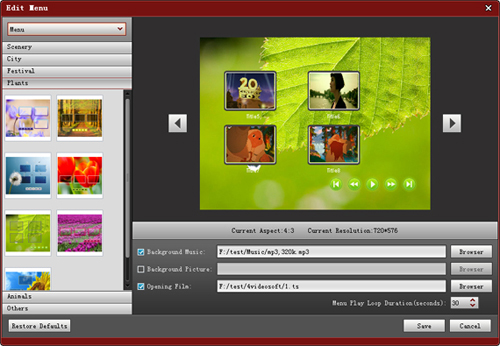
Click the arrows or click edit menu button Edit menu button to choose the menu template. After opening the edit menu interface, you can select the menu template,frame, button, and text (title, font, color and size) for your preference.

Step 5: Choose subtitle and audio track
Click the “Subtitle” or “Audio Track” button to choose the subtitle and audio track you want for the output DVD. You can also add your own subtitle and audio track. It is easy for you to adjust the volume, latency, encoder, bitrate and channel of audio track, and adjust the subtitle’s position, delay, font name, font size, and font color.
Step 4: Start making DVD in Windows 10
Click “burn” button Burn DVD on the right bottom of the main interface to burn your customized DVD. Please remenber to insert a black DVD-R D5 or D9 as per your content capacity, and set the TV standard like NTSC or PAL. At last, click “Save” to start burning. Then you can watch your DVD on TV with your friends now!
Method 3: Make DVD in Windows 10 using DVD styler
>> Free Download DVD Styler
DVDStyler-3.0.2-win32.exe, DVDStyler-3.0.2-win64.exe
DVD styler is an Open source software to create professional looking DVD’s with just few clicks and less effort. It is free software which creates a burn Media files into DVD. The DVD styler gives many features like menu templates, create slideshow, and add multiple subtitle and audio tracks. It can also import images as background wallpaper of menu for the DVD. It supports all type of video or audio formats to execute and copy them into the DVD in less time. And the most fascinating and best feature about the DVD styler is that it uses media files without re-encoding such like MPEG and VOB files take time to re-encode into the DVD File.


